The Inside Knot
Step by Step Guide to how to do the “inside knot”
| Step 1: Measure about 50 – 60 inches of qian jin string. If u are lazy to measure, just hold the string and stretch out your arms sideways. The length is about twice the distance from your left hand to right hand. Then loosen your strings considerably. | |
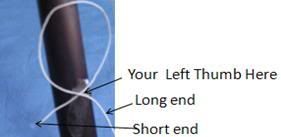
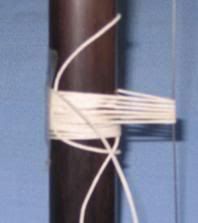
| Step 2: Make a loop such that the shorter end is at the left and the really really long end is at the right. Place your left thumb at the position indicated in the picture. |
|
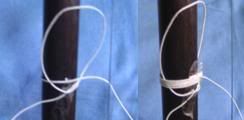
| Step 3: Pull the string in an anti clockwise fashion around the rod of your erhu. Repeat for 4 - 5 times. Look at the pictures to the right for some idea how it’d look like. |
|
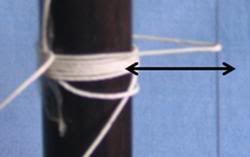
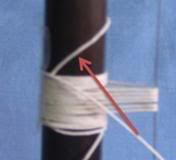
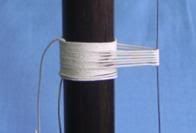
| Step 4: Here’s a mildly tricky part. Pull the qian jin around the string. The optimal gap (shown by the arrow) should be the size of YOUR thumb. As in, you can fit your thumb in. If the distance is too short, the strings would be too hard, thus affecting your vibratos and, well, it hurts as well. And if the distance is overly large, u can’t even play the note properly. So, get it right. |
|
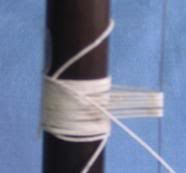
| Step 5: Alternate between pulling the qian jin around the strings and the rod for five times. It should look like this by now. |
|
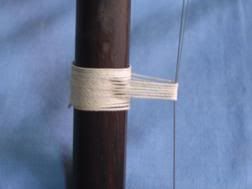
| Step 6: Then pull the qian jin around the rod for five more times till its like the picture u see on the right. |
|
| Step 7: Use the long side of the qian jin left, and weave it under the loop. Follow the red arrow. Pull it till the end. |
|
| Step 7 continuation: You’d see something like this if you had done it right. Now pull the remaining ends on top together with the remaining end at the bottom. Pull it such that the knot gets into the inside of the qian jin. Hard to understand? Just try it. You’d be amazed. |
|
| Step 8: Now u should be seeing this. The knot inside the qian jin that u have just tied. Cut off the excess strings. Shift it around to your liking. |
|
 There u go, a perfect “inside knot” qian jin.
This method is the most popular as it is most reliable. Since the knot is inside, u wont have problems such as the knot coming off, or the knot getting into your way when u play the first register. Also, its strong, as even if a part of the qian jin still broke, like when you’re on stage, chances are the qian jin would still hold out for a couple of hours.
But it takes quite a but of practice to get it right. And for starters, be prepared to have to retie a couple of times if u cannot maintain the loop’s position with your thumb.
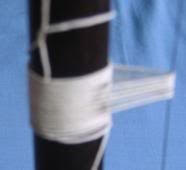
For those who are too lazy to learn, there is actually another method. Basically, this other method ignores the inside loop, and just go straight for pulling the strings around the rod. The outcome would be like this :
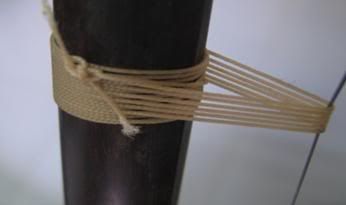
Well if you are halfway through a practice and want to save time. This would suffice temporarily. The knot is outside, and therefore it comes off easily, and is therefore strongly advised against if you are going to perform on stage.
Some Extra Info…
Distance from sound box to qianjin
Some people asked what the height from the sound box to the qian jin should be. Well I must say there is no definite answer. Most professionals follow the length by placing their elbow on the soundbox and tying to qian jin at where their root of their little finger is. This method may be a good marker, but if you have exceptionally short or long hands, or short hand long fingernails, whatever alien u are, its unreliable. The average length determined by the shop I work at is 38cm. But my opinion? Shift it around to find your best, most suited spot.
Mini Qian Jin as fine tune?
Some people might have noticed that some SCO musicians like Ling Hock Siang likes to tie this funny little qian jin on top of their qian jin. Well for those people who don’t know, these are fine tunes! By shifting it around, you change the pressure of the fine tunes on the strings.
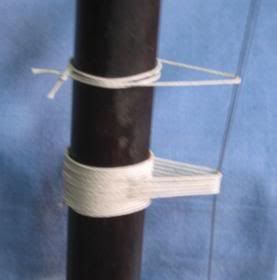
To tie this, you first have to pull a bit of qian jin once around the rod, then another time around ONE OF THE STRINGS, then once more around the rod, then tie a dead knot with the two ends. U can choose to do it with one, or both strings. This is a good way to spend your little bits and pieces of wasted qian jin strings.
Well now u guys know more about how to tie the qian jin, and some physics behind it, now stop asking your friends to do it for you! =D Good luck with trying out, and post me any comments or questions u have.
3 comments:
Thank you for this info. Any other info you have would be helpful. I am about to buy this instrument and I do not know how to play but I will persist until I do.
I have been to the Dunhuang site and they have great erhu. I am interested in the Ou Li Da less expensive model. I like that it is all wood and suspect that it will make a difference in the sound.
What strings are preferable? Also, what tuner? Thank you again for your advice and help. Suzy
Truly enlightening. Thanks a ton. Wish u write more.
This is the first time I've seen an instruction for qianjin that showed the strings up close. I could not tell if they were pulled together or left spaced apart. Looks like its the former.
Post a Comment